2.6. Collaborating with Git#
Note
For Robot Software Practicals students, this chapter is a half-way checkpoint of the Linux manual. Completing this chapter helps you to meet the deadline (Wednesday, September 10, 2025, 23:59) for group login on GitLab, and ensures that you have made at least one commit to your group’s private GitLab repository.
As a programmer, once you have created scripts, code, or other text-based files, you may want to keep a version history to back-up and track progress, or to to share your project with collaborators. A popular command-line based tool for this is called Git. In fact, the source files for this manual are also maintained through Git.
With Git, you can work on the same codebase simultaneously without breaking it for someone else, keep track of what changed and by who, and much more. Git helps maintain a detailed history of the shared code base, allowing to revert back to older versions if needed, but it also allows to collaborators to create alternative work-in-progress versions of the code base, for example to fix bugs, which can later be merged back into the main code base (see Fig. 2.7.
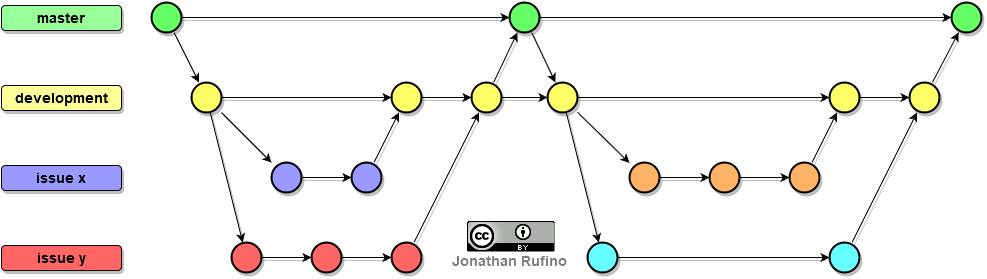
Fig. 2.7 Graphical illustration of a Git version history, where each node represent a snapshot state of the code base, and arrows indicate which later snapshot is based on what earlier snapshot. The graph shows that Git allows branching off different versions, for example to address issues listed on a project’s issue tracker website, which can later be merged back into the main code base.#
Image credits: Attany, CC BY-SA 4.0 https://creativecommons.org/licenses/by-sa/4.0, via Wikimedia Commons (source).
A Git repository can also be reproduced on multiple computers, each containing their own local copy of the version history. By regularly exchanging missing parts of the version histories between such remote copies or clones, multiple people can work on the same code base simultaneously, and merge their work . For instance, in this course you will collaborate with your lab partner through Git. Rather than directly synchronising a local Git repository with its clone on your lab partner’s computer, it is more convenient to use a third intermediate Git repository on a webserver which is always available to the both of you. While multiple of such (commercial and free) web services exist, for this course you must use the repository we created for you.
To practice using the Git from the command line, the exercises in this chapter are divided as follows:
First, we will configure the Git setup on your computer, and get your gitlab account ready. These steps will only need to be performed once.
Next, you can follow step-by-step exercises to create a new local Git repository, and add files and their changes as individual code commits. You will also learn to check the status of your repository.
Afterwards, we will make use of an online interactive tutorial which will introduce you to more Git commands, and help you visualize the results on the version history graph.
Finally, we turn to using Git to collaborate with your lab partner on the shared code repository.