1.2. Hand-in lab assignment 2#
This section describes the requirements for Lab 2.
Important
For this assignment you should work through the manual and its exercises up to and including Section 7.2. You do not need the provide the solution to any of the exercises in this manual. However, it is in your own interest to complete all of the exercises you find throughout the text: you will need all of the insight you acquire in this module to successfully complete the others.
You will work on this hand-in assignment with your assigned lab partner. Carefully read the minimum submission requirements listed in Section 1.2.1 to avoid penalties. The hand-in task for this lab assignment will be described in Section 1.2.3, for which you have to commit code to your group’s new Git repository.
The deadline for this assignment is Wednesday, October 2, 23:59 . To submit, do not send anything to the Teach Assistants (TAs) or lecturers, but ensure that you and your partner’s work is in the master branch in your group’s private lab 2 repository.
You may only hand in your own work, and you are responsible for not sharing your code with students outside your group. Only use the Gitlab repository we will provide to collaborate with your partner. If we believe you have used material from other groups, or you have submitted material that is not yours, it will be reported to the exam committee. This may ultimately result in a failing grade or an expulsion.
Finally, if you find errors, ambiguously phrased exercises or have questions about this assignment, please use the Brightspace lab support forum.
1.2.1. Minimum submission requirements#
Your solution must be uploaded to the master branch in the private Git repository of your Lab 2 group, hosted at: https://gitlab.ro47003.me.tudelft.nl.
Do not use an account on gitlab.com, github.com nor bitbucket.com (or any other such service).
The deadline for the submission is Wednesday, October 2, 23:59 . Before that deadline, it is obligatory that
your group’s work must have been placed in the group’s private repository on the TU Delft Gitlab server provided by us. You will be given a new repository for this lab, so do not reuse the repository from the previous lab,
all files created for the final assignment must be included in the master branch on Gitlab, which is the only branch that will be checked,
both lab partners must have contributed at least one Git commit to the
masterbranch using their own TU Delft Gitlab account which adds non-comment lines of code to a Python source file, or to a ROS launch or config file, that is part of your completed solution. Tip: You can usegit annotate <filename>to see who committed which lines.
If code is submitted that was written with ill intent, e.g. to manipulate files in the user’s home directory that were not specified by the task, which collects user passwords or exhibits similar malware-like behavior, you will immediately fail the course.
Danger
These minimum submission requirements should be easy to fulfill for any student actively participating in the lab assignments. Note that these requirements do not say anything about the completeness or quality of your code, but they are a hard requirement (ie: a lower bar) that demonstrate a sufficient minimum effort before the deadline.
If you fail to fulfill these minimum submission requirements, the penalty stipulated on the course information will be applied.
1.2.2. Feedback#
After the submission deadline, you will receive peer-feedback on the following points of your solution:
The quality of your code: is the code well organized and not overcomplicated?
The quality of your solution: does the code do what it is supposed to do?
The quality of your documentation: does the readme explain how to use the code and is the code itself well commented?
Of course, you will also be required to give peer-feedback on the solutions of several of your fellow students.
1.2.3. Assignment#
Complete the tasks described in this section together with your lab partner. You have completed the solution when it complies with all the task deliverables listed below. It is okay if you don’t succeed at perfectly solving everything, as this should give you feedback on your own understanding. However, take into account that both partners must fulfill the minimum submission requirements.
1.2.3.1. Task 1 - Keep your repository up-to-date#
When you hand in your solution to the tasks, ensure that you include all necessary files, and only the necessary files.
Task deliverables
The README contains both your student names and numbers;
The README states any resources from which you copy-pasted code, such as ChatGPT;
The README text should be written for students following this RSP course, so you should not need to explain Singularity, the Virtual Machine, etc. You should assume only packages in the provided Singularity image are available, and thus should not require package installation instructions.
Your repository should include files you created to complete this assignment including configuration files and source code. If other files that you did not create should be included, this will be stated explicitly in the task description.
By following the instructions in your README and with your provided files, a capable student should be able to reproduce your result and be able to check that you completed all tasks.
Important
The repository should not contain any debug code, unnecessary files or directories, or binary files such as rosbags.
The repository should not contain a custom ROS package! It should also not be required. This is not covered yet in this lab assignment, and also not suitable for peer-review at this stage. Even if you already know how to create new ROS packages, you must solve the tasks as described in the task description, and not make it more complex!
1.2.3.2. Task 2 - Inspect a rosbag#
Download the (compressed) rosbag here: https://surfdrive.surf.nl/files/index.php/s/GIaCvALkwQkaFjI .
The compressed file is called RSP_rosbag2_2024_09_17-17_58_45.tar.xz, and you can extract it with
$ tar -xf RSP_rosbag2_2024_09_17-17_58_45.tar.xz
This should give you a directory RSP_rosbag2_2024_09_17-17_58_45/ which is the rosbag,
after which you can remove the compressed file (ie: the .tar.xz).
Inspect the provided rosbag for this hand-in assignment.
Task deliverables
Your README should report on the following:
a list all the topic names and their message types present in the bagfile;
also for the whole bag file, the average number of messages per second over the whole bagfile (i.e., number of messages / duration)
Caution
Don’t include the compressed file nor any of the content of the rosbag directory, in your Gitlab repository. Git was not designed for storing large binary files. You can give instructions in your README how others can reproduce your setup.
If you do store the rosbag in the local working directory of your Lab 2 repository,
then make sure to add the name of the directory to the .gitignore file so that you can’t accidentally git add it.
If .gitignore is properly setup, or if the rosbag is somewhere outside of your local repository,
then running git status should not show the rosbag directory.
1.2.3.3. Task 3 - Animate a Mirte Master robot using the rosbag#
Create in RViz a 3D animation of the Mirte Master robot using the JointState and TF messages from the rosbag of Task 2.
To do this you should:
Replay the rosbag at half speed. Note that some of the topics in this rosbag may have a different name from what is/will be expected by other nodes, so you will need to instruct the bag player to publish several topics in the Bag under a different name. This can be easily done using
--remap(hint: seeros2 bag play --help).Use the approach discussed in Section 6.5.8 to publish TFs for the (simplified) “Mirte Master” robot described in that section. Recall that the node here needs to subscribe to
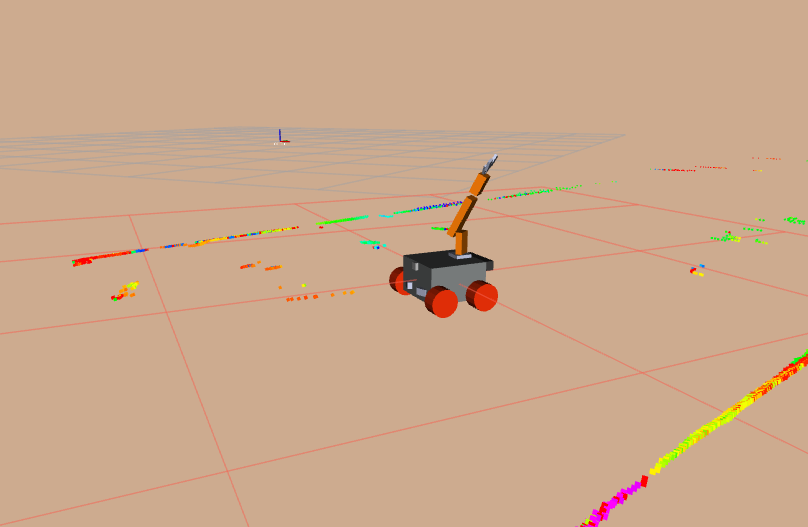
JointStatemessages on a particular topic to construct the full TF tree.Create an appropriate RViz configuration. Try to set the display options to match what is shown in the image below. Note that:
RViz’s fixed frame is
odom(although to get started it might be easier to set it tobase_linkinitially).RViz’s background color has changed.
There is also a Grid display on
base_link.There is a TF display that only shows the transform between two frames (can you tell which?); try to set the display options to disable visualizing the 3D axes of all the other frames.
Some sensor message from the rosbag is shown.
Task deliverables
Your repository should include all necessary configuration files. For this task, you may need to use some configuration file provided by this manual, so you are allowed to copy it into your repository.
Also add the RViz config file to your repository.
Report in your README on all exact shell command needed to reproduce your solution to this task.
Tip
To help you debug this step, you could play the bag with the “looping” option such that it restarts once the end of playback is reached.
A downside of restarting a bag is that RViz may not understand that time has “reset”. It can help to press the Reset button in RViz’s Time panel.
Remember that when you replay a rosbag, all nodes except the bag player will need to use simulated ROS Time, so you may need to add some additional startup parameters to your nodes (and don’t forget to update your README instructions accordingly).
1.2.3.4. Task 4 - Program your own JoinstState publisher#
Tip
Discuss with your lab partner how you will collaborate and divide the work on the programming tasks before you start adding files to your repository as both your contributions will be needed to fulfill the minimum submission requirements.
Write a single-file Python program that acts as a ROS node when executed. This ROS node must use as its own name the TU Delft netid of one the lab partners, and not be the same as the node of Task 5!
This python program should publish JointState messages, and smoothly vary the value for each joint.
Also create a visual representation of the ROS graph with the nodes and topics of this setup.
To show the animation on the “Mirte Master” robot you will probably need to start some additional nodes, similar to the previous tasks.
An easy way to generate smooth values for each joint is to take the node’s ROS Time in seconds, and pass this as input to Python’s
sin(t)orcos(t)function. You can simply assign this value to all joints, or try something more fancy.To properly construct the
JointStatemessage, study how its values are set in the rosbag (hint: you can echo the message content). A single message should contain a list of joint names and a list of corresponding position values for each of those joints. Be sure to set thestampin theheaderfield of theJointStatemessage you publish (see these tips).Be sure to run your node using
use_sim_timeif you are running this together with the rosbag.Note that when you run this program, you should avoid publishing the
JointStates from the rosbag on the same topic. So, instruct the rosbag player which topics you do or don’t want to publish using its--topicsargument.Also create a visual representation of the ROS graph with the nodes and topics of this setup. To generate a picture of the ROS graph, you can use a GUI tool that you learned about. In Ubuntu you can make screenshots using the
PrintScreenorPtrScrbutton on your keyboard.
Task deliverables
Add the Python script to your repository. Make sure the node set its name to one of your student netids.
Include instructions on how to run the Python program and on how to start RViz and any other required node(s).
Add a screenshot of the visual representation of the ROS graph to your repository.
Include the ROS graph screenshot as an image in your README (if you don’t know how, search online for the Markdown syntax to include an image).
1.2.3.5. Task 5 - Program a node to respond to clicks in RViz#
Tip
Discuss with your lab partner how you will collaborate and divide the work on the programming tasks before you start adding files to your repository as both your contributions will be needed to fulfill the minimum submission requirements.
Write a single-file Python program that acts as a ROS node when executed. This ROS node must use as its own name the TU Delft netid of one the lab partners, and not be the same as the node of Task 4!
This Python program should subscribe to the topic published by RViz’s Publish Point tool, to which a message is published every time the user clicks on some object in RViz’s 3D view, such as the default Grid (note: clicking the RViz background won’t result in a message publication). The name of this topic is described in the RViz Tool section of this manual. You can use the topic’s name to figure out the topic’s message type.
Every time the node receives a clicked point message it should publish a simple
visualization_msgs/msg/Markermessage, with the shape and color randomized on every click. Every time a new marker is published, it may replace the previously published marker. You can come up with your own topic name to publish this marker on, but be sure to update your RViz config to have an appropriate display for that topic.Now the important part: the marker should appear and remain at the same position as the robot’s gripper. Hint: think about how to set the
frame_idin the marker’s header.Also create a visual representation of the ROS graph with the nodes and topics of this setup. To generate a picture of the ROS graph, you can use a GUI tool that you learned about. In Ubuntu you can make screenshots using the
PrintScreenorPtrScrbutton on your keyboard.
Task deliverables
Add the Python script to your repository. Make sure the node set its name to one of your student netids.
Include instructions on how to run the Python program, and on how to start RViz and any other required node(s).
Add a screenshot of the visual representation of the ROS graph in your repository.
Include the ROS graph screenshot as an image in your README (if you don’t know how, search online for the Markdown syntax to include an image).