8.1. Creating a workspace#
In this section you will learn to create a workspace and learn how to set up an overlay for development and testing.
A workspace is a directory containing ROS 2 packages. Before using ROS 2, it’s necessary to source your ROS 2 installation workspace in the terminal you plan to work in. This makes ROS 2’s packages available for you to use in that terminal.
Note
A workspace is a directory with a particular structure. Commonly
there is a src subdirectory. Inside that subdirectory is where the
source code of ROS packages will be located. Typically the directory
starts otherwise empty.
The ROS2 build tool colcon does out of source builds meaning that build targets
are placed in a different directory. By default it will create the
following directories as siblings of the src directory:
The
builddirectory will be where intermediate files are stored. For each package a subfolder will be created in which e.g. CMake is invoked.The
installdirectory is where each package will be installed to. By default each package will be installed into a separate subdirectory.The
logdirectory contains various logging information about eachcolconinvocation.
8.1.1. Source your ROS 2 underlay environment#
It is important that we have sourced the environment for an existing ROS 2 installation that will provide our workspace with the necessary build dependencies for the example packages. This is achieved by sourcing the setup script provided by a binary installation or a source installation, ie. another ROS workspace. We call this environment an underlay.
$ source /opt/ros/humble/setup.bash
The workspace you will create will act as an overlay - a secondary workspace where you can add new packages without interfering with the underlay, in this case the existing ROS 2 Humble environment that you’re extending.
Note
Keep in mind that an underlay for a new overlay workspace does not necessarily have to be the main ROS 2 installation, it could also be another ROS 2 environment.
Your underlay must contain the dependencies of all the packages in your overlay. Packages in your overlay will override packages in the underlay. It’s also possible to have several layers of underlays and overlays, with each successive overlay using the packages of its parent underlays.
8.1.2. Create a new workspace directory#
Best practice is to create a new directory for every new workspace. The
name doesn’t matter, but it is helpful to have it indicate the purpose
of the workspace.
Let’s choose the directory name ros2_ws, for “development workspace”:
$ mkdir -p ~/ros2_ws/src
$ cd ~/ros2_ws/src
Another best practice is to put any packages in your workspace into the
src directory. The above code creates a src directory inside
ros2_ws and then navigates into it.
This workspace, ros2_ws, will be an overlay on top of the existing
ROS 2 underlay.
In general, it is recommended to use an overlay when
you plan to iterate on a small number of packages, rather than putting
all of your packages into the same workspace.
8.1.3. Add package source code to your workspace#
In later sections of this manual you will create your own packages, but for now you will practice putting a workspace together using existing package source code.
If you went through the
Beginner: CLI Tools tutorials, you’ll be familiar with turtlesim.
Let’s make our own turtlesim package.
To do this, we’ll clone the source code of the official turtlesim ROS package from its
github repository and place it in our workspace’s src directory.
A repo can have multiple branches and for many ROS packages
there will be a branch that matches your ROS 2 distribution.
So, when you git clone this repo, add the
-b argument followed by that branch name to checkout the correct version.
In the ros2_ws/src directory, run the following command:
$ git clone https://github.com/ros/ros_tutorials.git -b humble
Now ros_tutorials is cloned in your workspace.
The ros_tutorials
repository contains the turtlesim package, which we’ll use in the
rest of this tutorial.
Note that the created ros_tutorials directory contains more package
sub directories that also have a package.xml,
but these will be ignored by colcon
because they contain an (empty) COLCON_IGNORE file.
So far you have populated your workspace with a sample package, but it isn’t a fully-functional workspace yet. You need to resolve the dependencies first and then build the workspace.
8.1.4. Resolve package dependencies#
Before building the workspace, it is important to make sure that all the dependencies for the packages in your new workspace have been installed. Otherwise, it may be impossible to build the project, for example because certain C++ libraries or ROS message definitions from other packages are still missing.
Tip
You may have all the dependencies already, but best practice is to check for dependencies every time you clone. You wouldn’t want a build to fail after a long wait only to realize that you have missing dependencies.
Packages declare their dependencies in the package.xml file (you will
learn more about packages in the next tutorial).
We can use the rosdep command to look through all source
directories for dependency declarations in package.xml files,
and automatically install the missing packages for us.
From the root of your workspace (ros2_ws), run the rosdep command as follows:
# cd if you're still in the `src/` directory with the `ros_tutorials` clone
$ cd ..
$ rosdep install -i --from-path src --rosdistro humble -y
If you already have all your dependencies, the console will return:
#All required rosdeps installed successfully
8.1.5. Build the workspace with colcon#
From the root of your workspace (ros2_ws), you can now build your
packages using the command:
$ colcon build
The console will return the following message:
Starting >>> turtlesim
Finished <<< turtlesim [5.49s]

Summary: 1 package finished [5.58s]
Note
Other useful arguments for colcon build:
--symlink-installallows the installed files to be changed by changing the files in thesrc/directory (e.g. Python files or other non-compiled resources) for faster development without needing to rebuild every time. This is mostly useful for Python ROS packages, but not so much for C++ ROS Packages.--packages-up-tobuilds the package you want, plus all its dependencies, but not the whole workspace (saves time).--event-handlers console_direct+shows console output while building (can otherwise be found in thelogdirectory).--executor sequentialprocesses the packages one by one instead of using parallelism.
Once the build is finished, we can inspect the content of the workspace root directory
(~/ros2_ws):
$ ls
build  install  log  src
As we can see, colcon has created the three derived directories
build/, log/ and install/ from our initial src/ directory.
Tip
You can enable TAB-completion for
colconin yourbashshell. If thecolcon-argcompletepackage is installed, you could addcolcon-argcomplete.bashto your~/.bashrcfile.If you do not want to build a specific package place an empty file named
COLCON_IGNOREin its directory, and it will be ignored bycolcon.
8.1.6. Source the workspace as an overlay#
When colcon has completed building successfully, the output will be in the install directory.
Before you can use any of the installed executables or libraries,
you will need to add them to your path and library paths.
colcon will have generated bash/bat files in the install directory to help set up the environment.
These files will add all of the required elements to your path and library paths as well as
provide any bash or shell commands exported by packages.
Before sourcing the overlay, it is very important that you open a new terminal, separate from the one where you built the workspace. Sourcing an overlay in the same terminal where you built, or likewise building where an overlay is sourced, may create complex issues.
In the new terminal, source your main ROS 2 environment as the “underlay”, so you can build the overlay “on top of” it:
$ source /opt/ros/humble/setup.bash
Go into the root of your workspace:
$ cd ~/ros2_ws
In the root, source your overlay:
$ source install/local_setup.bash
Note
Sourcing the local_setup of the overlay will only add the packages
available in the overlay to your environment. setup sources the
overlay as well as the underlay it was created in, allowing you to
utilize both workspaces.
So, sourcing your main ROS 2 installation’s setup and then the
ros2_ws overlay’s local_setup, like you just did, is the same as
just sourcing ros2_ws’s setup, because that includes the
environment of its underlay.
Now you can run the turtlesim package from the overlay:
$ ros2 run turtlesim turtlesim_node
But how can you tell that this is the overlay turtlesim running, and not your main installation’s turtlesim?
Let’s modify turtlesim in the overlay so you can see the effects:
You can modify and rebuild packages in the overlay separately from the underlay.
The overlay takes precedence over the underlay.
8.1.7. Modify the package in the overlay#
You can modify turtlesim in your overlay by editing the title bar on
the turtlesim window. To do this, locate the turtle_frame.cpp file in
~/ros2_ws/src/ros_tutorials/turtlesim/src. Open turtle_frame.cpp
with your preferred text editor.
Find the function setWindowTitle("TurtleSim");, change the value
"TurtleSim" to "MyTurtleSim", and save the file.
Return to the first terminal where you ran colcon build earlier and
run it again.
Return to the second terminal (where the overlay is sourced) and run turtlesim again:
$ ros2 run turtlesim turtlesim_node
You will see the title bar on the turtlesim window now says “MyTurtleSim”.
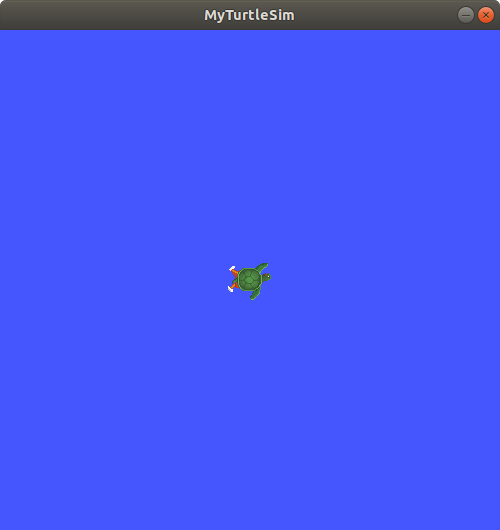
Even though your main ROS 2 environment was sourced in this terminal
earlier, the overlay of your ros2_ws environment takes precedence over
the contents of the underlay.
To see that your underlay is still intact, open a brand new terminal and source only your ROS 2 installation. Run turtlesim again:
$ ros2 run turtlesim turtlesim_node
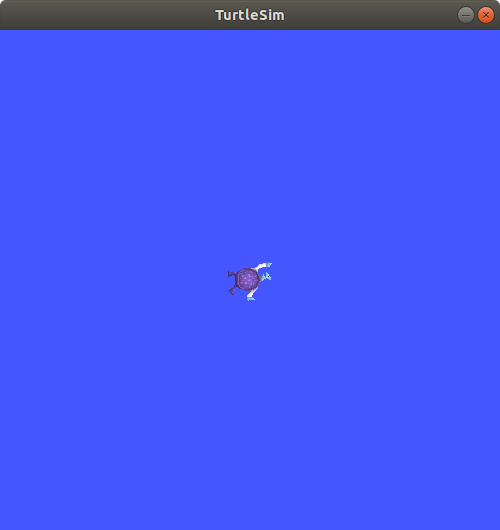
You can see that modifications in the overlay did not actually affect anything in the underlay.
8.1.8. Summary#
In this tutorial, you sourced your main ROS 2 distro install as your underlay and created an overlay by cloning and building packages in a new workspace. The overlay gets prepended to the path and takes precedence over the underlay, as you saw with your modified turtlesim.
Using overlays is recommended for working on a small number of packages so you don’t have to put everything in the same workspace and rebuild a huge workspace on every iteration.